Create a portable solar USB charger with battery backup for just $5! Follow this easy DIY guide to power your devices anywhere using solar energy.
A $5 DIY project that replaces a $60 commercial device sounds unbelievable, right?
This becomes reality with a solar USB charger that includes battery backup. Commercial solar chargers often cost more than $60. You can build one for just $5, and the solar panel costs only $3. The best part? The charger runs completely independent from the power grid and proves especially useful during camping and hiking trips.
This piece will teach you how to build your own solar-powered USB charger. The process is straightforward for DIY enthusiasts and anyone looking to save money while supporting green energy. You’ll learn everything from component selection to final assembly of a working device that keeps your phone charged away from power outlets.
Essential Parts for Your $5 Solar Charger
You’ll need three main components to build a solar USB charger that works reliably.
Solar Panel Options Under $3
The 6V mini solar panel is the core component of this project. Monocrystalline panels are the most efficient with a 17% energy conversion rate. These small panels produce about 0.5W of power and are 70x55x3mm in size. The open circuit voltage ranges from 5V to 10V based on available light.
USB Circuit Choices
A USB charging circuit regulates the power output. This component turns the solar panel’s varying DC output into a steady 5V that USB devices need. Good USB circuits work with voltages as low as 2V and deliver about 600mA (0.6A) of current. This makes it work well with simple USB devices, though newer phones might need more power.
Battery Types and Costs
You can choose between two main battery options:
| Battery Type | Advantages | Cost Range |
|---|---|---|
| Lead-acid | Inexpensive, maintenance-free | Lowest cost per amp-hour |
| Lithium-ion | Lighter weight, longer lifespan | Higher initial investment |
Rechargeable AA batteries with 2600mAh capacity work best for this project. These batteries strike a great balance between cost and performance. Two AA batteries in series create the right voltage for steady USB charging.
A blocking diode keeps your batteries safe by stopping reverse current flow. This ensures batteries don’t drain through the solar panel when light is low. This small part helps your system last substantially longer.
Setting Up the Solar Panel Circuit
Your solar USB charger needs a proper circuit setup to work quickly and safely. Note that the solar panel must face direct sunlight to achieve optimal charging performance.
Connecting the Solar Panel
Start the wiring process by soldering one wire to the positive (+) tab and another to the negative (-) tab on the solar cell. The panel needs unobstructed sunlight because even window glass can reduce charging performance by a lot. The panel’s position affects its efficiency, and mounting it at an angle where sunlight hits directly improves overall energy potential.
Here are everything in connecting your solar panel:
- Strip the solar panel wire by approximately half an inch
- Tin the wire ends with solder
- Connect the positive wire to the charge controller’s solar input
- Attach the negative wire to the controller’s negative terminal
- Secure all connections with heat shrink tubing
Adding the Protection Diode
A protection diode is a vital component that prevents power from flowing backward into the solar cell. This simple semiconductor works like a one-way valve and allows current to flow from the panel to the battery while blocking reverse current.
You need to pay attention to polarity during diode installation. The side’s black line indicates the negative end (cathode), and the unmarked side represents the positive end (anode). Solar applications need a 3-8 amp diode to handle current properly.
Protection diodes are a great way to get benefits beyond preventing reverse current. They protect against battery drainage during nighttime or cloudy conditions. The diode also prevents potential “hot spots” that could damage solar cells during partial shading. Test the diode with a multimeter after installation – a working diode should show about 0.45 volts.
Installing the Battery Backup System
Your solar USB charger’s battery backup system is the heart of the entire setup. First, you need to assemble and wire this system carefully to make sure it works at its best.
Battery Holder Assembly
You need the right components to set up a proper battery holder. Two AA battery holders are the foundations of your power storage system. These holders should be mounted firmly to avoid movement and connection problems.
The assembly process involves these key steps:
- Position the battery holders side by side
- Secure them using double-sided foam tape or small screws
- Check for proper terminal alignment
- Ensure the holders can accommodate NiMH rechargeable batteries
Wiring the Batteries
Your backup system’s performance depends on the wiring configuration. So, you need the right connection techniques for the best results. You can get the voltage you need when you connect the battery holders in series by joining the red wire of one holder to the black wire of another.
| Connection Type | Purpose | Voltage Output |
|---|---|---|
| Series | Higher Voltage | 2.4V per pair |
| Parallel | Extended Runtime | 1.2V kept |
Strip about half an inch of insulation from each wire end before making the final connections. Then twist the exposed conductors together. Use a wrapping pattern that tightens as the wires pull against each other.
Test the battery voltage with a multimeter after assembly:
- Connect the black lead to COM terminal
- Attach the red lead to the V terminal
- Set multimeter to DC voltage mode
- Touch probes to respective battery terminals
Make sure all connections stay secure and properly insulated. Your battery system should show a stable voltage reading during testing. You might want to add a thermistor for better safety to check charging temperature, especially when you’re not around to monitor it.
Adding the USB Charging Port
Your solar charger will deliver the right power to your devices when you connect the USB charging circuit correctly. The DC to DC USB booster circuit is the core component that converts the battery’s 2.4V output to the standard 5V needed by USB devices.
USB Circuit Installation
Look for the positive (+) and negative (-) symbols on the USB circuit board’s underside. The circuit needs at least 2V to work, which makes it compatible with our battery setup. Follow these steps to install:
- Connect the positive wire from the battery holder to the circuit’s positive terminal
- Attach the negative wire to the circuit’s negative terminal
- Secure all connections with solder
- Check if the red LED indicator lights up when powered
The USB circuit works with simple smartphones and mobile players. But this setup won’t power Apple devices or tablets that need higher current draw.
Testing the Output Voltage
Safe device charging depends on correct output voltage testing. A digital multimeter gives the most accurate readings. The voltage measurements should match these values:
| Test Point | Expected Reading | Action if Different |
|---|---|---|
| USB Output | ~5V | Check circuit connections |
| Under Load | 4.75V – 5.25V | Verify battery charge |
Steps to test the USB output:
- Set your multimeter to DC voltage mode
- Connect the red probe to the USB positive terminal
- Attach the black probe to the negative terminal
- Make sure the voltage reads about 5V
The red LED on the USB circuit board should light up after proper installation, which suggests it’s ready for charging. The voltage reading that is different from 5V means you should check the circuit connections or look for a faulty component. Take measurements with and without a connected device to confirm stable voltage under load.
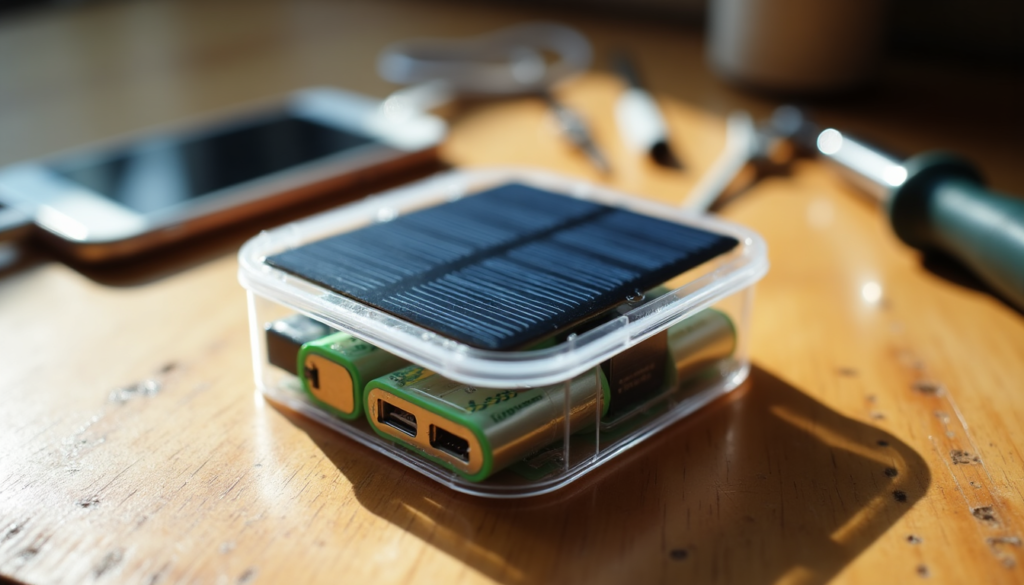
Making Your Charger Portable
Your solar USB charger needs protection from environmental elements to last longer and work reliably. A well-enclosed charger can handle outdoor conditions and still work at its best.
Simple Case Options
The right enclosure choice depends on how you plan to use it. A waterproof container with built-in O-rings will give a great defense against moisture. Here are some proven options you can try:
| Case Type | Benefits | Best Use Case |
|---|---|---|
| Tupperware | Built-in moisture seal, lightweight | Regular outdoor use |
| Pelican Case | Heavy-duty protection, waterproof | Extended outdoor exposure |
| Dry Box | Compact, weatherproof | Camping trips |
Some models come with foldable or rollable solar panels that make storage and transport easier. These designs let you quickly set up your charger while keeping all protective features intact.
Weatherproofing Tips
Temperature control is vital in protecting your solar charger. Lithium batteries work best at around 70 degrees Fahrenheit, and too much heat can shorten their life. Here are the key protection steps you should take:
- Create a drip loop in cables to prevent water from following the wire into ports
- Apply liquid electrical tape around USB connections
- Seal unused ports with silicon sealant
- Place the battery pack in a thermal lunch bag for temperature control
- Position the charger away from direct sunlight when possible
The battery compartment needs extra care. A zip-lock bag is enough to protect components from occasional water exposure. Outdoor installations work better when you mount the solar panel at an angle that catches direct sunlight and lets water run off.
Heat protection matters a lot. Batteries should stay in the shade or inside a ventilated enclosure since direct sunlight can make them too hot. You can place the battery pack under raised solar panels to create natural shade while keeping charging quick.
Here are some advanced protection methods to boost durability:
- Apply heat-shrink tubing around wire connections
- Use silicone tape for sealing vulnerable points
- Install rubber grommets where wires enter the enclosure
- Add ventilation holes in strategic locations to prevent condensation
Your enclosure should fit all components but stay compact enough to carry around. A well-sized case can store cables and the charging circuit together. These details will make your solar USB charger ready for outdoor adventures, camping trips, or emergencies.
Conclusion
A $5 DIY solar USB charger is a great way to charge your devices without breaking the bank. You’ll get the same features as expensive store-bought options and won’t need to rely on grid power.
Your solar charger will work reliably in all conditions if you put it together correctly. The right components make all the difference – from a quality monocrystalline solar panel to a protective diode and battery backup. These parts work together to create a power source you can count on for your USB devices.
The charger’s lifespan increases with good weatherproofing and the right case selection. A proper enclosure combined with temperature control and moisture protection turns this simple circuit into a tough outdoor power source.
This project shows you don’t need to spend much to harness solar power. Some simple tools and attention to detail are all you need to build a reliable charging system that helps the environment.
FAQs
Q1. How much does it cost to build a DIY solar USB charger? You can build a solar USB charger with battery backup for as little as $5, with the solar panel itself costing only about $3. This is significantly cheaper than commercial solar chargers, which can cost over $60.
Q2. What are the essential components needed for a solar USB charger? The main components required are a 6V mini solar panel (preferably monocrystalline), a USB charging circuit to regulate power, rechargeable AA batteries for storage, and a protection diode to prevent reverse current flow.
Q3. Can this DIY solar charger power all types of devices? This solar charger is designed to work with basic smartphones and mobile players. However, it may not provide sufficient power for devices that require higher current, such as Apple products or tablets.
Q4. How can I make my solar USB charger weatherproof? To weatherproof your charger, use a waterproof container with built-in O-rings, create a drip loop in cables, seal connections with liquid electrical tape, and consider placing the battery pack in a thermal lunch bag for temperature control.
Q5. What’s the best way to test if my solar USB charger is working correctly? Use a digital multimeter to test the output voltage. Set it to DC voltage mode and connect the probes to the USB terminals. The reading should be approximately 5V. Also, check that the red LED on the USB circuit board illuminates when powered.
References
[1] – https://www.seeedstudio.com/blog/2019/10/17/best-mini-solar-panels-for-diy-projects/?srsltid=AfmBOoqaEHibVh1SolMQH60nitt54UDBztk5HnCk8N8Y1-osexwiEu2z
[2] – https://www.streetlights-solar.com/a-comprehensive-guide-on-solar-battery-chargers.html
[3] – https://www.browndoggadgets.com/products/usb-charging-circuit
[4] – https://www.souoppowerstation.com/parts-needed-to-build-a-diy-solar-generator/
[5] – https://www.fuelcellstore.com/solar-usb-2-kit
[6] – https://www.reddit.com/r/preppers/comments/wpdbo3/question_about_keeping_solar_panels_and_power/
[7] – https://www.instructables.com/Making-the-Most-From-a-USB-Solar-Charger/
[8] – https://www.instructables.com/Solar-USB-Charger-20-21/
[9] – https://shopsolarkits.com/blogs/learning-center/how-to-connect-a-solar-panel-to-a-12-volt-battery
[10] – https://shopsolarkits.com/blogs/learning-center/how-to-connect-diode-to-solar-panel
[11] – https://www.electricaltechnology.org/2019/10/blocking-bypass-diode-solar-panel-junction-box.html
[12] – https://www.teachengineering.org/sprinkles/view/uconn-2111-build-solar-usb-charger-circuit-design
[13] – https://www.instructables.com/Solar-USB-Charger-3/
[14] – https://www.engineeringforchange.org/news/how-to-build-a-solar-powered-usb-charger-for-phones-and-other-small-devices/
[15] – https://www.fluke.com/en-us/learn/blog/renewable-energy/test-solar-panel?srsltid=AfmBOooc-pIhPkPfY9toV-1b6_j_0t6lg75e-gQcnFDSjZ4FsQNLzEsi
[16] – https://www.reddit.com/r/onebag/comments/is024r/looking_for_a_waterproof_power_bank_and_solar/
[17] – https://expeditionportal.com/forum/threads/diy-portable-solar-controller-box-setup.146700/
[18] – https://www.instructables.com/DIY-Solar-Phone-Charger-5-Portable-100-Batter/
[19] – https://www.instructables.com/4-Solar-Battery-Charger/
Blexza Blog | Global Fusion Blog | Urdu Global Fusion Blog | TrendNovaWorld Blog

With 12 a long time of encounter, Zara Beauty is a flexible essayist covering a wide extend of subjects, from wellbeing and fund to innovation and way of life. Her skill lies in conveying well-researched, locks in, and fact-based substance, guaranteeing perusers get precise and profitable insights.
📌 Ability: In-Depth Inquire about | SEO Substance | Slant Analysis
Follow Zara for master experiences over numerous specialties, sponsored by validity and encounter.